Thrift Flip: How to Upcycle an Ugly Old Top Into This
Do you have any old shirts laying around that you don’t wear anymore?
Or is there a thrift store near you where you could get one?
If so, this thrift flip is a perfect project to turn an old, oversized top into a cute new top to wear this summer. It could also be done with whatever lightweight fabric you have lying around. Best part about this project – it’s super easy and only takes a few hours to make!
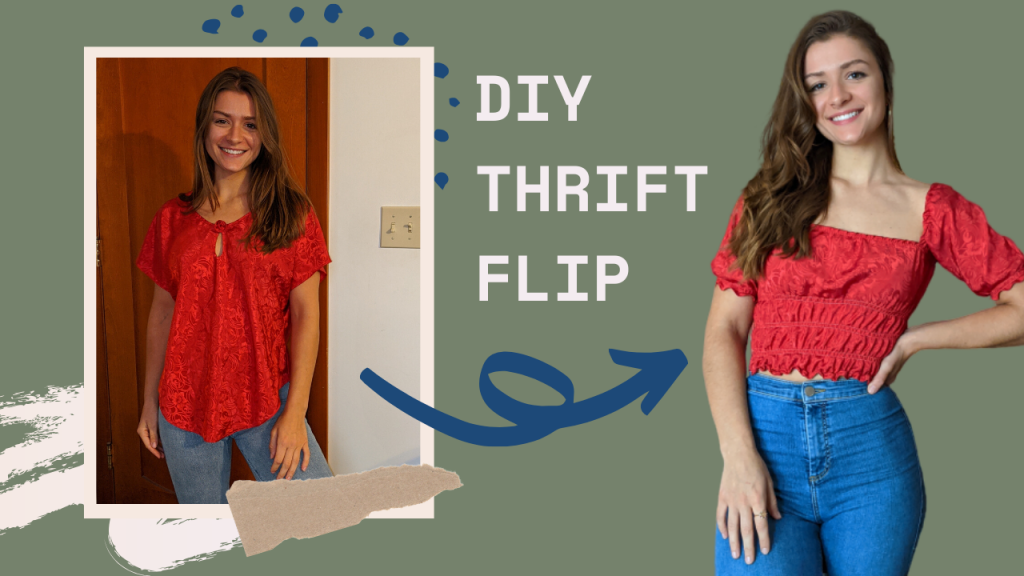
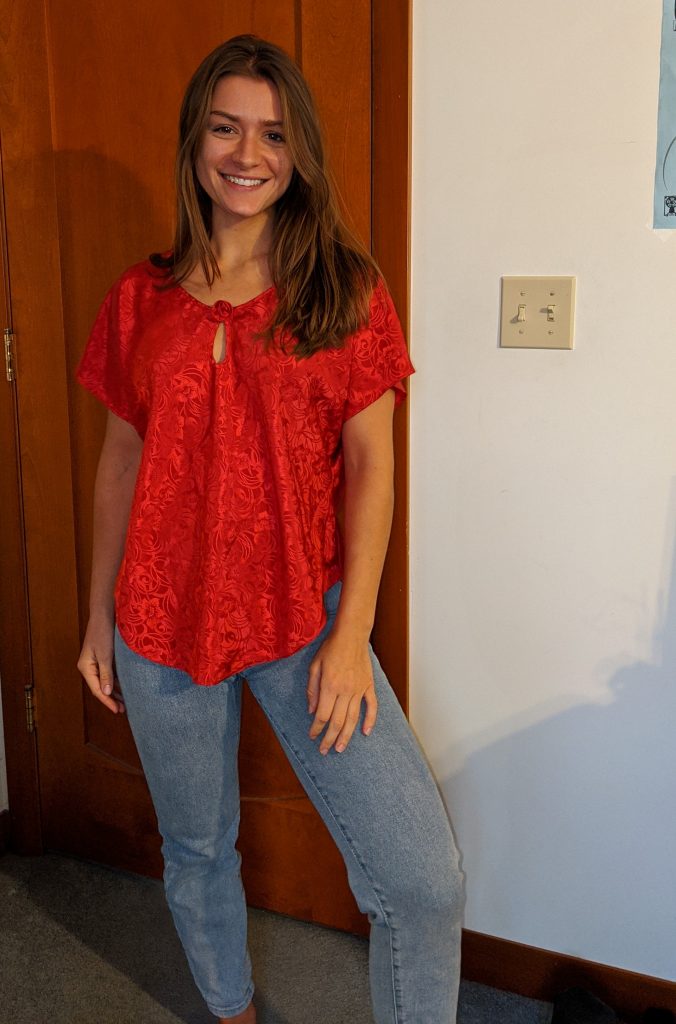
I got my original top from the Salvation Army for $3.99. Here’s how it looked before:
And after a few hours of sewing, here’s what I was able to turn it into!
The way I sewed the sleeves, I’m able to wear them both regularly or off-the-shoulder, as you can see from the photos. I’ll show you how to do this thrift flip the same way, but will also describe below (and in the video) what to do differently if you want it to just be one way or the other.
Though I like that mine is multi-functional, it probably would be more comfortable to simply choose one style and stick to it. That way, the elastic won’t be too tight or loose when you change the style.
One other modification you can make (if you want) would be in the shirring process. I’ve made similar tops before where it’s shirred from top to bottom or from just under the bust down instead of in three rows like this.
So feel free to experiment with that. One thing to keep in mind though is that it’s a huge pain in the butt to seam rip elastic thread! It’s not so easy to pull out like regular thread, so you basically have to seam rip one stitch at a time. So I’d recommend experimenting on a scrap piece of fabric first.
With that said, let’s get started with this thrift flip!
These are the materials you’ll need:
Just so you know, I’ve linked most of the materials below so you know where to find them. I’m not an affiliate for any stores mentioned; these are just the products I generally use.
Fabric* – You’ll either need:
An oversized, lightweight top that’s at least 1.5 to 2 times larger in width than your waist
*The best kinds of fabric for shirring are: lightweight cotton, 100% rayon, or rayon challis.
Total Cost:
Just to be completely transparent with you, I like to share how much I spent on each of my designs. Here’s what this one added up to:
Salvation Army top: $3.99
100% polyester thread from Hobby Lobby: $1.99
Elastic thread: $10.28 for two large spools
Braided elastic: $1.99
Total: $18.25
Though this price may seem high, that’s only because I invested in those two spools of elastic thread to make it. I’ve since used that thread, as well as the polyester thread and braided elastic, for several other projects. So, the real cost is actually much lower.
Now that you have your materials, here’s how you make the top:
Here are some basic step-by-step instructions if you’re upcycling this from another top:
Step 1: Cut and hem the bottom.
Step 2: Cut the top and sleeves off.
Step 3: Add elastic to the wrong side of the top of your shirt, then fold it over so the elastic is hidden and sew it in place again (be sure to pull on the fabric and elastic so that the fabric is flat when you sew it).
Step 4: Seam rip one side of the top all along where you want to shirr it. For me, that meant seam ripping it from just below the bust down to the bottom of the top.
Step 5: Shirr your top using elastic thread. If you don’t know how to shirr, here’s a great YouTube tutorial for it. Next, sew the seam closed again.
Step 6: Cut fabric for sleeves in either a rectangular shape (if you only want it to be an off-the-shoulder top) or with a slight angle at one end. I used an existing shirt to trace and cut out my own sleeves.
Step 7: Sew the underside of the sleeves closed and hem the bottom edges.
Step 8: Shirr the bottom edges of the sleeve using the same method used to shirr the rest of the top.
Step 9: Sew a casing where your sleeves will go over your shoulders. Once you’re done with that, seam rip a small opening and pull elastic through. Then, you can try each sleeve on and sew the elastic together at the size that’s most comfortable for you.
Step 10: Match up the top inner seams of your shirt with the top inner seam of your sleeves and sew the sleeves in place.
And that’s it! Your thrift flip top is all done.
As I mentioned before, this really is a simple design that’s perfect for beginners. What I like about it is how quickly you can turn an ugly old shirt into something new that you’ll love to wear!
If you decide to make this top, let me know if any questions come up and I’ll be happy to help. And don’t forget to let me know or send me a picture of how it turned out! I can’t wait to see how this thrift flip goes for you.